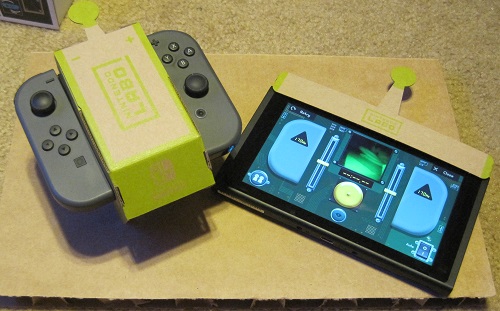
Nintendo Labo RC Car
 The first thing you are recommended to build in the Nintendo Labo Variety Kit is the RC Car, as it is the quickest to put together. Although it doesn’t look like a car at all, but makes me think more of those Hexbug Nano toys that are so popular now. Anyway let’s take a closer look at what this baby can do!
Building the RC car takes about 15 to 30 minutes, so you can probably do it in one sitting. It works by putting the JoyCons on either side of it, and tapping the screen to make each one rumble, which makes the car move. You can put a piece of cardboard on the screen that looks like an antenna, but it’s purely cosmetic. The only problem with the RC Car is that since it stands on little legs that are vibrating on the ground all the time, they can wear out after a while since it’s cardboard. But the game shows you how to reinforce the legs as well as make cosmetic changes like putting an elephant head on your car or a digger trough.
The neat thing about the RC Car is all the things you can do with it. Tap the center button on the Switch screen to open a panel to do all sorts of things. You can adjust the intensity of the rumble, but only the middle setting will make the car move. You can also view a little screen of what the RC Car can ‘see’ with the IR camera, and it’s a night vision camera, too, so you can drive around in the dark. Ring the bell and you can start battle music. If you have an extra set of JoyCons, you can build another RC Car (the game comes with an extra cardboard set), and you can battle with a single screen to try to knock one over! Best of all, by using one of the included reflective stickers, you can put the RC Car in autopilot mode and have it follow the reflective sticker using the IR Camera! You can even make a track with strips of reflective tape for the RC Car to follow. So the RC Car really has a lot of versatility.
And that’s really about it for the RC Car. For such a simple project, it works very well and has a lot of uses. Next up, we’ll take a look at the Labo Fishing Rod! Later! –Cary


May 23rd, 2018 at 11:41 am
Note, the sliders on each side of the screen during setup. You move those up and down to change the frequency of vibration for each controller. They can have subtle differences in their vibrational frequencies.
In other words, the sliders on each side should be adjusted so you get maximum movement on that particular side.
I’m totally going to have to use that in Physics class next year…
July 1st, 2018 at 12:08 am
Wow. Pretty cool.